
Wet, cold weather has been swirling across the Southern Hemisphere lately – which you would personally know if you’ve been in the path of Cyclones Debbie and/or Cook over the past fortnight. Side note: did you know there’s a kind of science for naming cyclones?! I hope you’ve been able to stay high and dry, I can only complain of getting drenched a few times on my bicycle ride to work #thankgoodnessforaircon #dryroomdryclothes
With all this ick weather, what better than epic chocolateness to improve our moods and stock up on those ‘much needed’ calories for the cooler days 😛 Not that we need any further justification, but I recently read that cocoa is also super high in magnesium and other beneficial nutrients 😉 So there’s those good excuses, but we’ve also had a couple of events to celebrate lately with said chocolateness: selling our house and celebrating a good friend’s significant birthday.
 WM")
 WM")
So first… we sold our little house (yaaaaaayyy!!!) in order to buy a bigger one 😀 Moving/selling/buying property is stressful for anyone but thankfully the sale went through without a hitch, this time… an earlier attempt to sell didn’t work out, but ya live and learn! We are now staying with my lovely in-laws until our purchase of a new house is confirmed. My MIL generously allows me to go crazy in her kitchen with cakes like this one which I made as a ‘thank-you’ to our real estate agents.

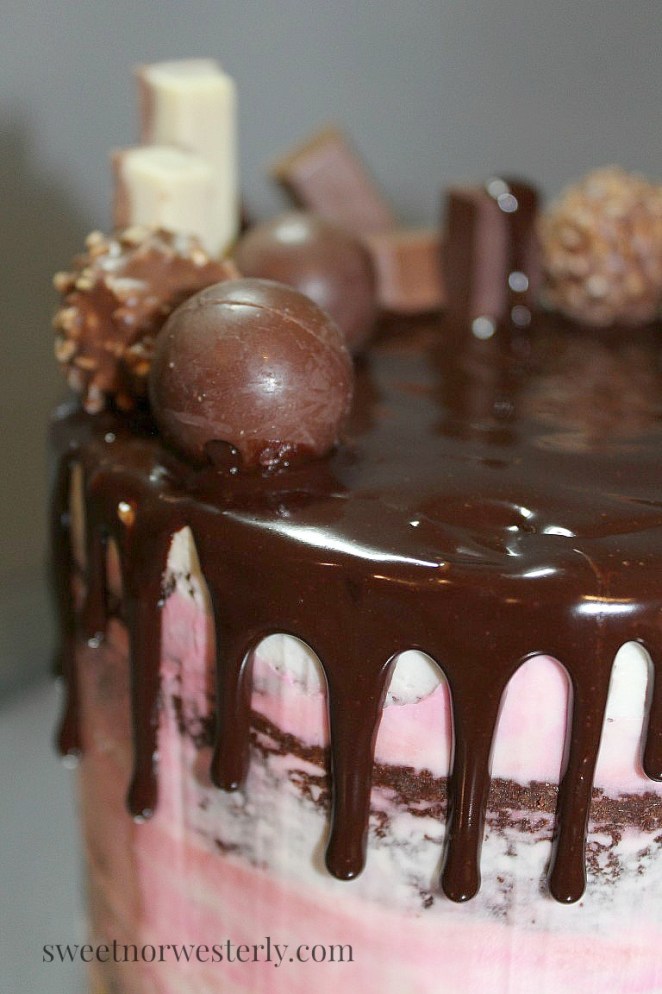
Our agents were so great, they didn’t pressure us into making decisions we weren’t comfortable with and they weren’t stressful to deal with, just all-round awesome 🙂 So I decided to thank them with this wee ‘chocolate overload’ cake, complete with salted caramel Lindt balls, tiramisu Kit Kats, Ferrero Rochers and a few Lindt bars for good measure. *drools*
Yes, I am back to eating this sort of deliciousness.
Yes, I will explain more at the end of the post!
 Wm")
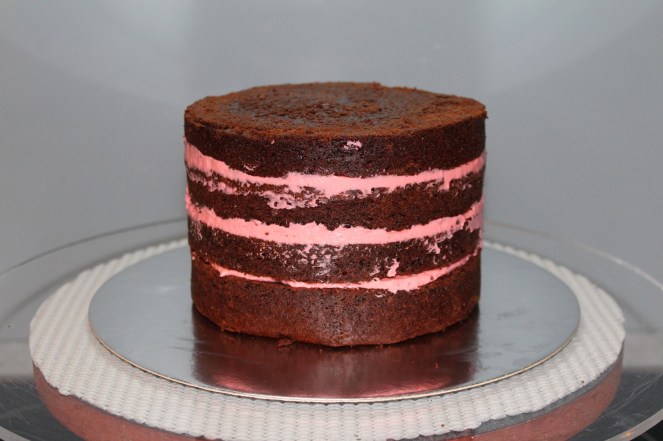
All those goodies were piled on a chocolate mud cake filled with meringue buttercream flavoured with raspberry powder, decorated semi-naked style with both vanilla and raspberry meringue buttercream, and topped with a dark chocolate ganache drip. Whew!!
Before we get into the tutorial, here’s a the detail on how to create the components of this cake:
- I used the Planet Cake recipe for the mud cake, but it was a little softer/crumblier than I would have liked, probably due to the buttermilk? I’m yet to find the perfect mud cake but when I do, you’ll be the first to know!
- When making meringue buttercream, I typically use the easier method of the Swiss version a la Summer Stone, and her 2:2:1 ratio for sugar : butter/fat : egg whites. I love how smooth meringue buttercream is, especially for the semi-naked look as it just glides into the gaps between layers, leaving those appealingly random patches of cakey goodness peeping through! More info on how to get that effect follows…
- That decadent chocolate ganache drip is a 2:1 ratio of dark chocolate to cream: heat the cream to boiling and then pour it over the chopped chocolate, leave covered for a minute then whisk to combine (if some of the chocolate hasn’t melted, nuke it on low for 30 second increments whisking in between). I used 50% cocoa chocolate for a great flavour and whipping cream (which I think is the same as pouring/single/heavy cream – unless someone wants to correct me?! In NZ there’s only one kind really!).
FYI more photos and deets of the second cake are after the tutorial, in case you’re wondering 😛
Semi-Naked Watercolour Buttercream Cake Tutorial
You might have seen my earlier posts of watercolour buttercream cakes: this one has how-to pics and a method to minimise scraping the icing away, and this one involves smearing extra icing onto a scraped cake to get the look you want. I reckon you have to work out for yourself what you prefer! For a semi-naked watercolour buttercream cake, it’s an even easier method – it doesn’t matter whether you add your buttercream all at once or one colour at a time, since you’re scraping right down to the cake each time. Now, onto the tutorial…
Start with your filled cake on a turntable. The layers don’t have to be perfectly lined up, as you’ll want to have some cake visible when it’s decorated. You can see that I’ve scraped the excess filling onto the cake – totally optional, possibly desirable if you want the filling colour to be visible (which it is in my case!).
Slap a big blob of buttercream on the top of the cake – approximately 1 cup worth for the 6″ cake I was covering. Using a small offset spatula, spread the buttercream thinly across the top until the excess hangs off the top edge. Remember that the semi-naked look is essentially a crumb-coat so it doesn’t matter if you can see some cake through the icing.
")
")
Now smooth that overhanging BC (before it falls off the eddggggggggge!) onto the sides of the cake as far down as it will go.

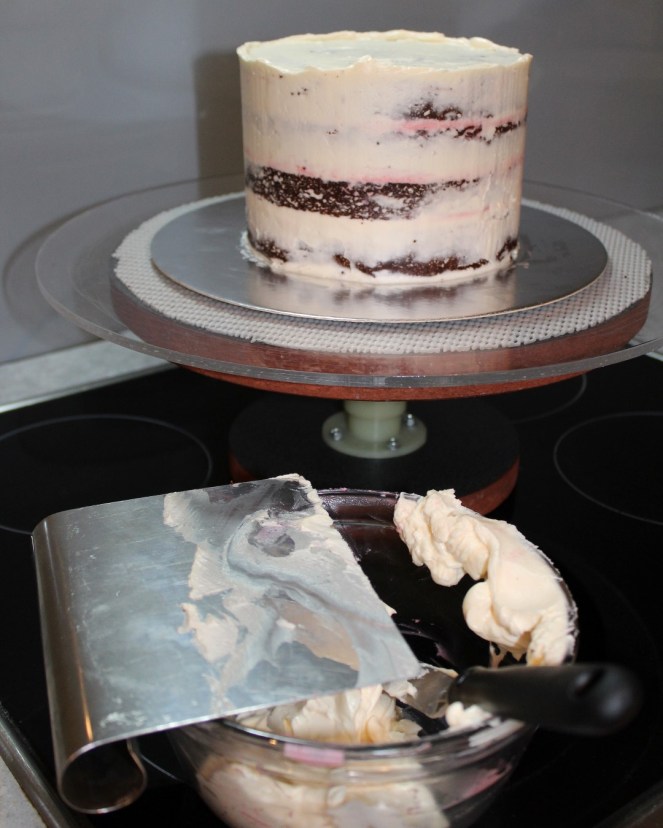
When you’ve spread out all the initial buttercream, add more to the cake’s sides to cover all the bare cake.

Grab a bench scraper / pastry or ganaching blade and scrape the excess buttercream off while turning the cake on the turntable, the whole way round the cake. I suggest having a spare bowl handy to wipe your excess buttercream off your scraper.
Now add your small buttercream splodges of contrasting colour at random spots around the side of your cake.

Use your scraper to lightly smooth out these splodges all the way around.
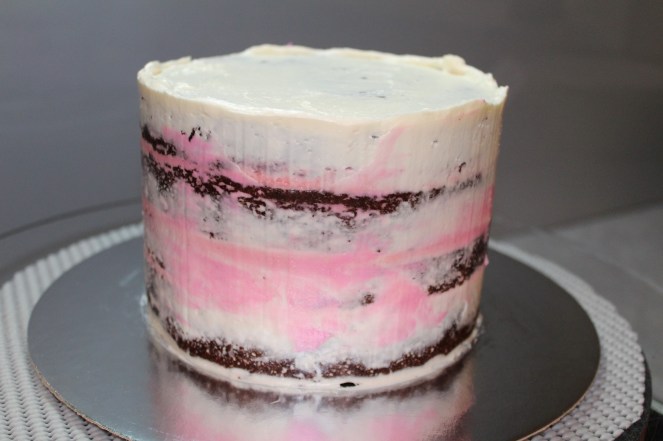
Then pick up your old friend the offset spatula again and tidy up the top edge by scraping inwards from the edge to the centre, keeping the blade parallel to the top surface.
")
Ta da! One semi-naked watercolour cake 🙂
The next images show some additional steps towards the glam of the ‘chocolate overload’ design (from left to right, top to bottom):
- Pour the runny ganache onto the top edge in a slow steady stream using a teaspoon or spatula to train the drip down the cake at the right spots.
- Then fill in the space in the centre with ganache, smoothing the top with your offset spatula while turning the cake on the turntable.
- Drips of varying heights.
- A selection of chocolates for decorating with.
")
")
")
")
And because we’ve not seen enough chocolate already (#easteroverload), onto Cake #2 🙂
This cake was part of the *surprise* birthday celebrations for a good friend, organised by his thoughtful wife. The brief was gold and black and “epic chocolateness” – challenge accepted!
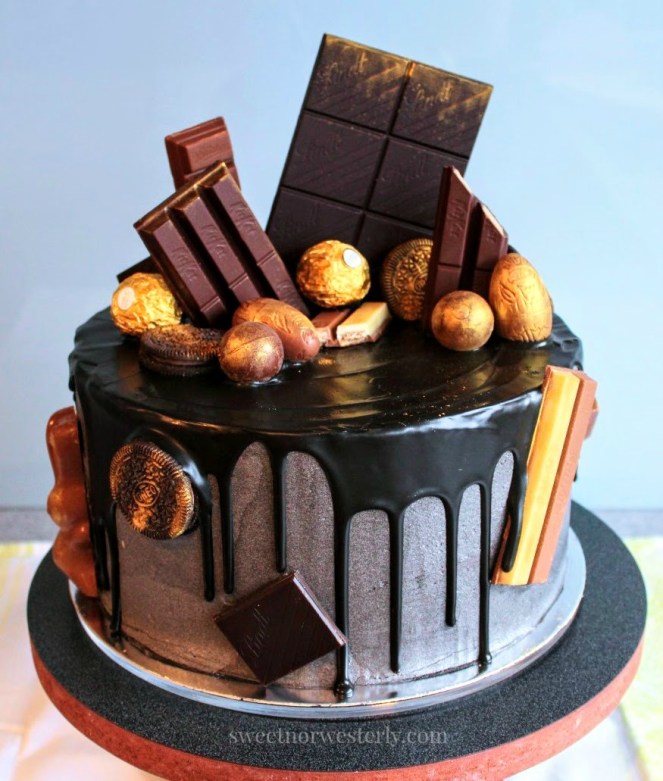
The gold dust on the decorations was fabulous Rolkem Majestic Gold. The buttercream underneath the chocolate ganache was flavoured with black cocoa powder which gave it an entirely natural grey-black colour; the colour intensifies the longer it’s left at room temperature. However I did have to add a little Progel black food colouring to the ganache (made with 70% cocoa chocolate at at 1:1 ratio with cream this time) to get it as close to black as possible.
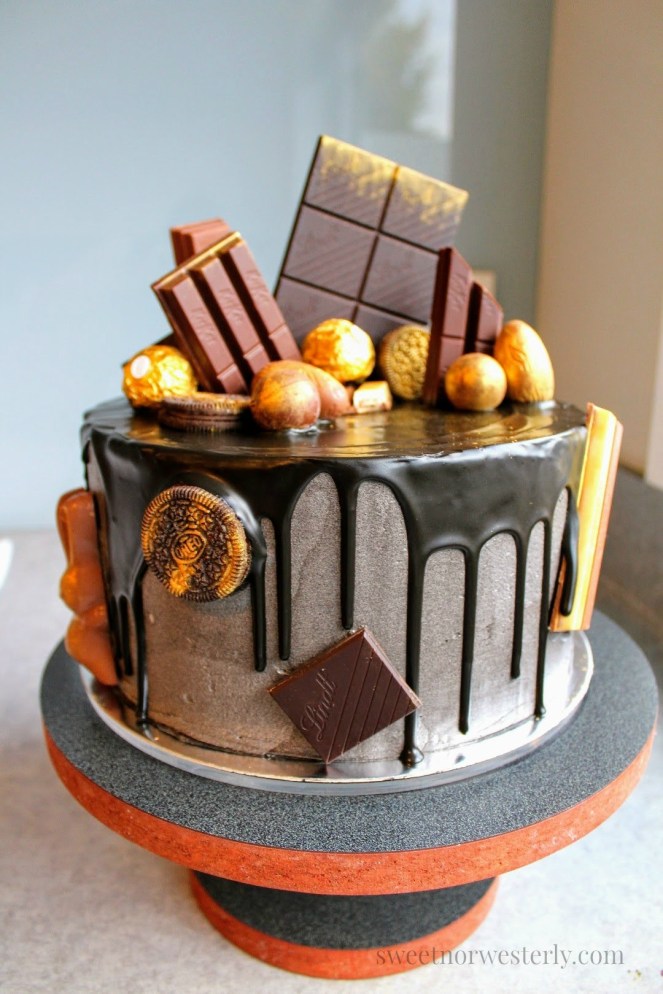
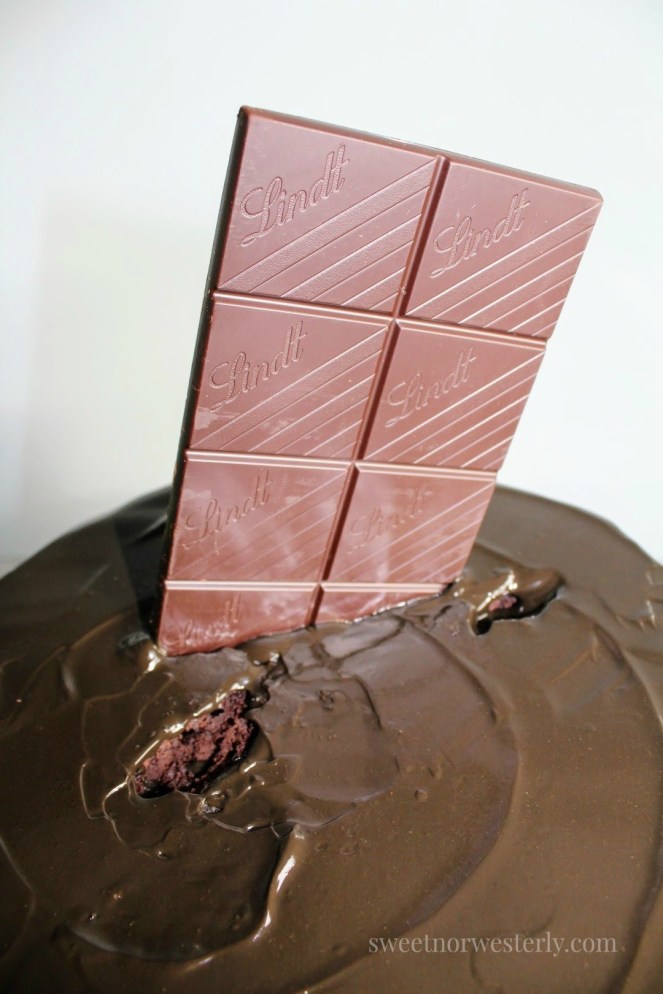
If you’re making a chocolate overload cake for the first time, it might be helpful to think about how your decorations will stay in place before you put them all in/on it. I found that cutting some cake out of the top layer where I was going to stick decorations in helped to give them stability (see pic below). Personally I found it easier to get chocolate bars to stay standing in the cake rather than attached to the side of it. And adding decorations while the ganache is still soft is pretty important to make sure everything sticks better!
Here is some other angles of the whole chocolatey mess delight – I had lots of fun adding and dusting the sweet Easter chocolates that hid like a choc egg hunt on this cake!!
 WM")
 zem")
 WM")
 WM")
Have you tried making a ‘chocolate overload’ cake? What did you decorate it with? Did the lucky recipient share any of the choc with you? 😉
Now for that IBS / gut health update…
As I mentioned I’m back to eating chocolate (yaaaaayyy!). Not only that but I’m also back on-board with other goodies involving sugar, dairy, wheat and other delicious ingredients that I was previously avoiding in the name of gut health via the paleo route.
Not that I’ve given up on my gut – although I’m tempted to! The ‘return to old ways’ came about a month ago. Firstly, the dietary changes I’d made weren’t helping: after two months of pretty strict paleo, I wasn’t feeling better or healthier, I was actually feeling more discomfort from digestion than before. Secondly, I had a week of stomach upsets that couldn’t be linked to any one food. A doctor’s visit later and I was booked to see the dietitian at the clinic to discuss how to best deal with my IBS symptoms.
The dietitian was really lovely and knowledgeable and listened to my (extensive) digestive history, including the recent dietary foray, and agreed that paleo probably wasn’t the whole answer to the problem. So she had me gradually reintroduce the non-paleo foods (including sugar!) and track my symptoms against what I was eating. Not surprisingly, this hasn’t yet revealed any correlation between the two – often I’ll eat the same thing twice in one week and have a different reaction to it each time! She also has me increasing my consumption of probiotics to populate my gut with ‘the good guys’, in terms of intestinal bacteria. And last but not least, I’m now trialling Colofac which is apparently commonly used in the UK to treat IBS symptoms. If you’ve ever tried it, I’d love to hear whether or not it worked for you.
The past few months haven’t been a total loss: I’ve learnt to appreciate the digestive power of insoluble fibre or ‘roughage’ from vegetables, I recognise the importance of eating less processed food, and I am now a lot more conversant with the ingredients favoured by people with food intolerances (in fact I’m still working on perfecting a dairy/gluten/nut-free seeded slice!). But for the meantime I’m glad to pretend I’m a ‘normal person’ (whatever that is..) and eat from all corners of the food pyramid! And because you read allllll the way to the end, here’s a word from hipster Belle #mainstreamismyjam


Congratulations on selling your house! I bet you can’t wait to move into the new place and get the party started! And yay for being able to eat chocolate again! I’m sorry you’re dealing with so much discomfort from IBS though. I hope this new medication will work well for you. As usual, your cakes as so gorgeous! I was just thinking the other day that it’s been so long since I’ve made a super duper chocolate bomb of a cake. Your treats are so much cuter than ours though! I mean, we have Kit Kats and Ferrero Rochers, but some of the other cute stuff can be hard to find. I bet the recipients were so glad to get them!
LikeLike