
#instacake #cakestagram #cakesofinstagram
If you’re a keen social media user and baker / caker, these #hashtags might be familiar to you. If not, you will wonder how I’ve so quickly lost my grasp of the English language. It’s actually kind of hard to explain, as I discovered when trying to do so for my lovely-but-uninitiated MIL recently. I think I described hashtags as ‘classifiers’ that group items together so they can be found when searching the web or a particular site.
Such as a certain photo-centric social media channel.
What a surprise, I’ve discovered Instagram! You might have noticed that on the right of this post >>> I’ve now got my Instagram profile postings showing. Like this special birthday cake for the bestie’s husband…
And this recent partly-successful attempt at macarons:
So, why the ‘Gram, you ask? Other than ‘why not’..?!
Often I bake and decorate something delicious using a delicious recipe from another blog or recipe book, putting my own twist on it in a small way, but it doesn’t seem significant enough to write a whole blog post about. Yet I still have this strange burning desire to share my sweet creations with the world… and as I typically keep Facebook for personal stuff, I’ve set up the Instagram profile for this blog alone. So if you’re an Instagram user, pretty please look up my handle sweet_norwesterly and click ‘follow’ to see what I’ve been baking 😀
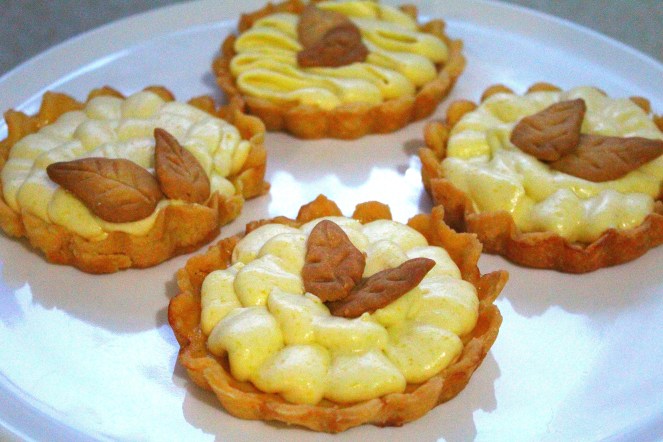
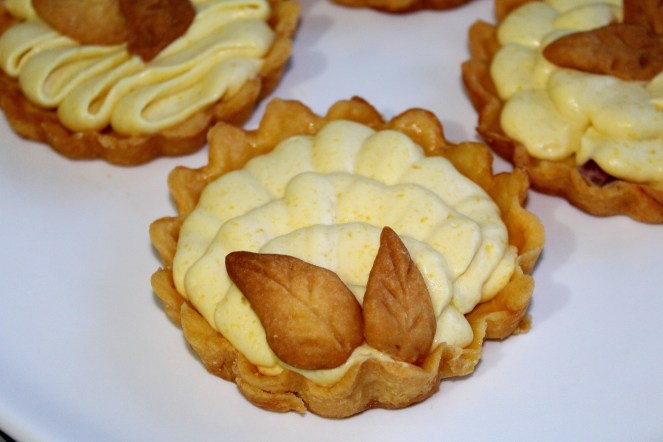
And speaking of baking [effortless segue], what happened to those #rhubarbmangocustardtarts that you thought you were going to see in this post?
They’re right here!
At this time of the year, there are lots of heavy, stomach-lining treats around – but also lots of rhubarb! And fresh mangoes! And finally the weather is warm enough to make me want to eat chilled desserts (yes, that’s probably the main reason). So shelve this one away for when you’re sick of heavy-iced gingerbread men and rich Chrissy fruit cake. Unless you never get sick of the deliciousness of the season, then just bookmark this one anyway!

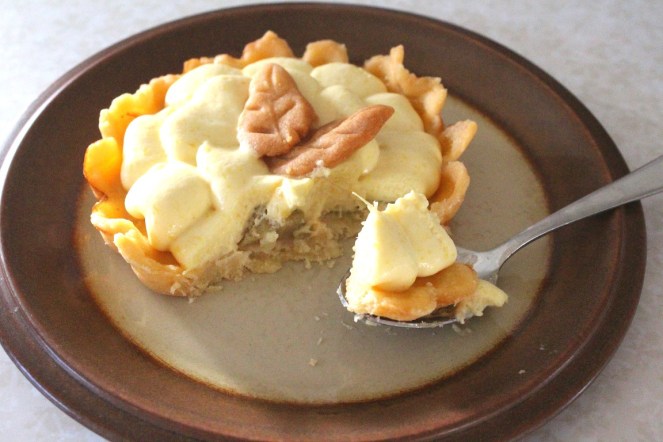
There are a fair few instructions, but don’t be put off by them – it’s a flaw of my nature that I want to give you ALL THE DETAILS… that way you’ll hopefully be able to get the same results as me! It’s honestly not difficult and not too time consuming. To reduce the effort you can forego it the mousse topping, but it’s totally worth the effort. The slightly tart (pun intended) mousse is complimented by the mellow custard underneath, and supported by the rich (but not too rich) pastry base.

I’ve made mango mousse before using this recipe, but I wanted to try this slightly different method. Which turned out to be pretty much the same. Which didn’t matter so much because I’m useless at sticking to a recipe even the first time I make it! Next time I’ll use a gelatine sheet instead of powder, because I prefer the texture but there was so little gelatine in it that powder is totally fine.
Anyway, here’s what you need to do:
- Make the pastry (super quick)
- Poach the rhubarb (also quick)
- Make the custard while blind baking the pastry in tart shells (quickly done if you have four arms, otherwise still not too bad!)
- Bake custard & rhubarb in tart shells
- Make the mango mousse while the tarts cool
- Pipe the mousse onto the tarts and gobble them all before anyone else gets to see them (because the season for giving is nearly over, anyway).
And breaking that down a bit more, here’s the recipe, with credit to the various sources that have inspired this fruity treat.

Rhubarb Custard Tart with Mango Mousse
Makes four 10 cm tarts
Tart Pastry
Adapted from Taste.com.au. This pastry is probably the most lovely, flaky but rich pastry I’ve ever made – and super easy to top it off! Big claim I know, but you have to try it to see for yourself.
- 1 cup plain flour
- 3 Tbsp caster sugar
- 100g butter, chilled and chopped into small cubes
- 1 egg yolk
- Place the flour, sugar and butter in a food processor and process at low speed until the mixture looks like fine breadcrumbs i.e. no obvious lumps of butter.
- Add the egg yolk and process or pulse until the dough has started to come together in lumps.
- Tip the dough onto a flour dusted surface and squish it together, kneading until it is a smooth lump (this doesn’t take more than a few seconds). Shape the dough into a ball then flatten, cover in cling film and refrigerate for half an hour.
- After refrigeration, remove the dough from its plastic and give it a few kneads on your floured surface. Place the dough between two sheets of non-stick baking paper and roll it out to a roughly square shape approx. 3mm thick.
- Grease four metal, loose-based, 10cm round & 3cm high tart tins (or one large, 20cm round tart tin) and turn one upside-down onto the dough to make cut-outs, like a cookie cutter, for each of the four tarts. Line each tart tin with a pastry cut-out, bringing the pastry at least two-thirds up the sides of each tin, trimming the excess. You can shape little leaves or other decorations from the pastry trimmings if desired!
- Bake the cases at 180°C (conventional oven) for 10 minutes or until not sticky to touch. If making one large tart instead of four small ones, blind bake the pastry by fitting a sheet of non-stick baking paper over the pastry and placing rice or beans (that you don’t want to cook!) before placing the tin in the oven, to prevent the pastry rising. Leave to cool at room temperature.
Poached Rhubarb
- Two sticks of rhubarb (or more if you want!), washed and chopped into approx. 2cm / half inch lengths
- 1/2 cup sugar
- water to cover rhubarb
- Place the sugar and enough water to cover the rhubarb into a small saucepan and heat on medium-high, stirring occasionally.
- When it is just about to boil (the water will be swirling on its own, you might hear it ‘hum’ – or maybe I’m just hearing things – and the sugar will be dissolved), lower your rhubarb into the water by the spoonful using a slotted spoon.
- Leave the heat at medium-high for another minute, then turn down to low / simmering.
- After 5 minutes test a thick piece of rhubarb with a knife – if it slides of the knife by itself, it’s ready. If not, leave for another two minutes then check again (and again, etc).
- When the rhubarb is ready, remove the saucepan from the heat and transfer the rhubarb into a bowl using your slotted spoon.
- When cool enough to touch, spread the pieces of rhubarb in the blind-baked tart shells. Any leftover rhubarb can be stored, covered in its cooking liquid, in an airtight container in the fridge for up to a week (love it on cereal!).
Baked Custard
Adapted from Food To Love. Because this custard is baked, I recommend using the following recipe rather than a store-bought or powdered custard. It’s really easy – no need to worry about stirring lumps out!
- 2 rounded Tbsp caster sugar
- 1/2 tsp vanilla paste (or essence if you don’t have paste)
- 2/3 cup milk
- 1 egg
- Place the caster sugar, vanilla and milk into a small saucepan and heat until nearly boiling (see note 2 above to help recognise this point!), stirring occasionally with a whisk to dissolve the sugar and prevent the milk from sticking to the pan.
- Lightly whisk the egg (to break up the yolk) in a heatproof jug large enough to hold the milk mixture also.
- When milk mixture is nearly boiling, pour it slowly into the jug with the egg, whisking to combine as you pour. Keep whisking for another 30 seconds after combining.
- Pour equal amounts of the custard over the rhubarb in the tart shells.
- Bake the tarts at 200°C or until custard has lost its shine and doesn’t jiggle when the tray is bumped. Remove from the oven and leave to cool at room temperature for 15 minutes then place on a heatproof barrier in the fridge.


Tarts sans mousse
Mango Mousse
Adapted from Hungry Rabbit.
- 1 mango
- 1/2 cup icing (confectioners) sugar, or to taste
- 2 tsp gelatine powder or 1 gelatine sheet (see discussion here when considering which to use)
- 4 Tbsp tepid water
- 2/3 cup fresh cream (at least 35% fat)
- Remove the flesh from the mango – see pictures below for how to do this if you’re unfamiliar! Use a whizz stick or food processor to puree the flesh then put it through a metal sieve to remove some of the fibre.
- Place the gelatine and water together in a small dish to let the gelatine bloom for 10 minutes or so.
- Combine the mango puree with the sugar in a small saucepan and stir on low heat until the mixture is nearly simmering / warm to touch. Remove from the heat and add the gelatine and its liquid and whisk well to combine. Pour the mixture into a heatproof bowl and leave to cool in the fridge until no longer warm to touch.
- When the mango mixture is cool, in a separate bowl whip the cream until it holds its shape i.e. doesn’t resist being pushed around the bowl. Add about a quarter of the cream to the cooled mango and fold carefully to combine. Add the remaining whipped cream and fold together until the mixture is mostly the same pale yellow colour. Check the flavour for sweetness and add more sifted icing sugar if desired.
- At this stage, my mousse wasn’t firm enough to pipe onto the tarts so I refrigerated it for an hour (and I could have left it longer) then used a piping bag fitted with a #127 Wilton piping tip to create patterns on top of the tarts. If you don’t want to pipe pretty patterns, carefully spoon the mousse onto the tarts and return them to the fridge to set for at least an hour.


There you have it! I’d love to know if you try this recipe and how it turns out – flick me a message in the comments or tag me in a pic on Instagram.
So with that not very Christmassy post, have a merry #Christmastagram… #Instamas? You get the idea xo


OMG Those look so delicious!
LikeLike
Thanks Miss Kelsiana! Hope you’re having a wonderful Christmas season xo
LikeLike